
Aug 20, 2026
Single-Sided vs Double-Sided Advertising Flags: A Practical Buyer Guide
Compare single-reverse and double-sided advertising flags by visibility, construction, weight, hardware, cost and best use. Choose the right print setup for your event.
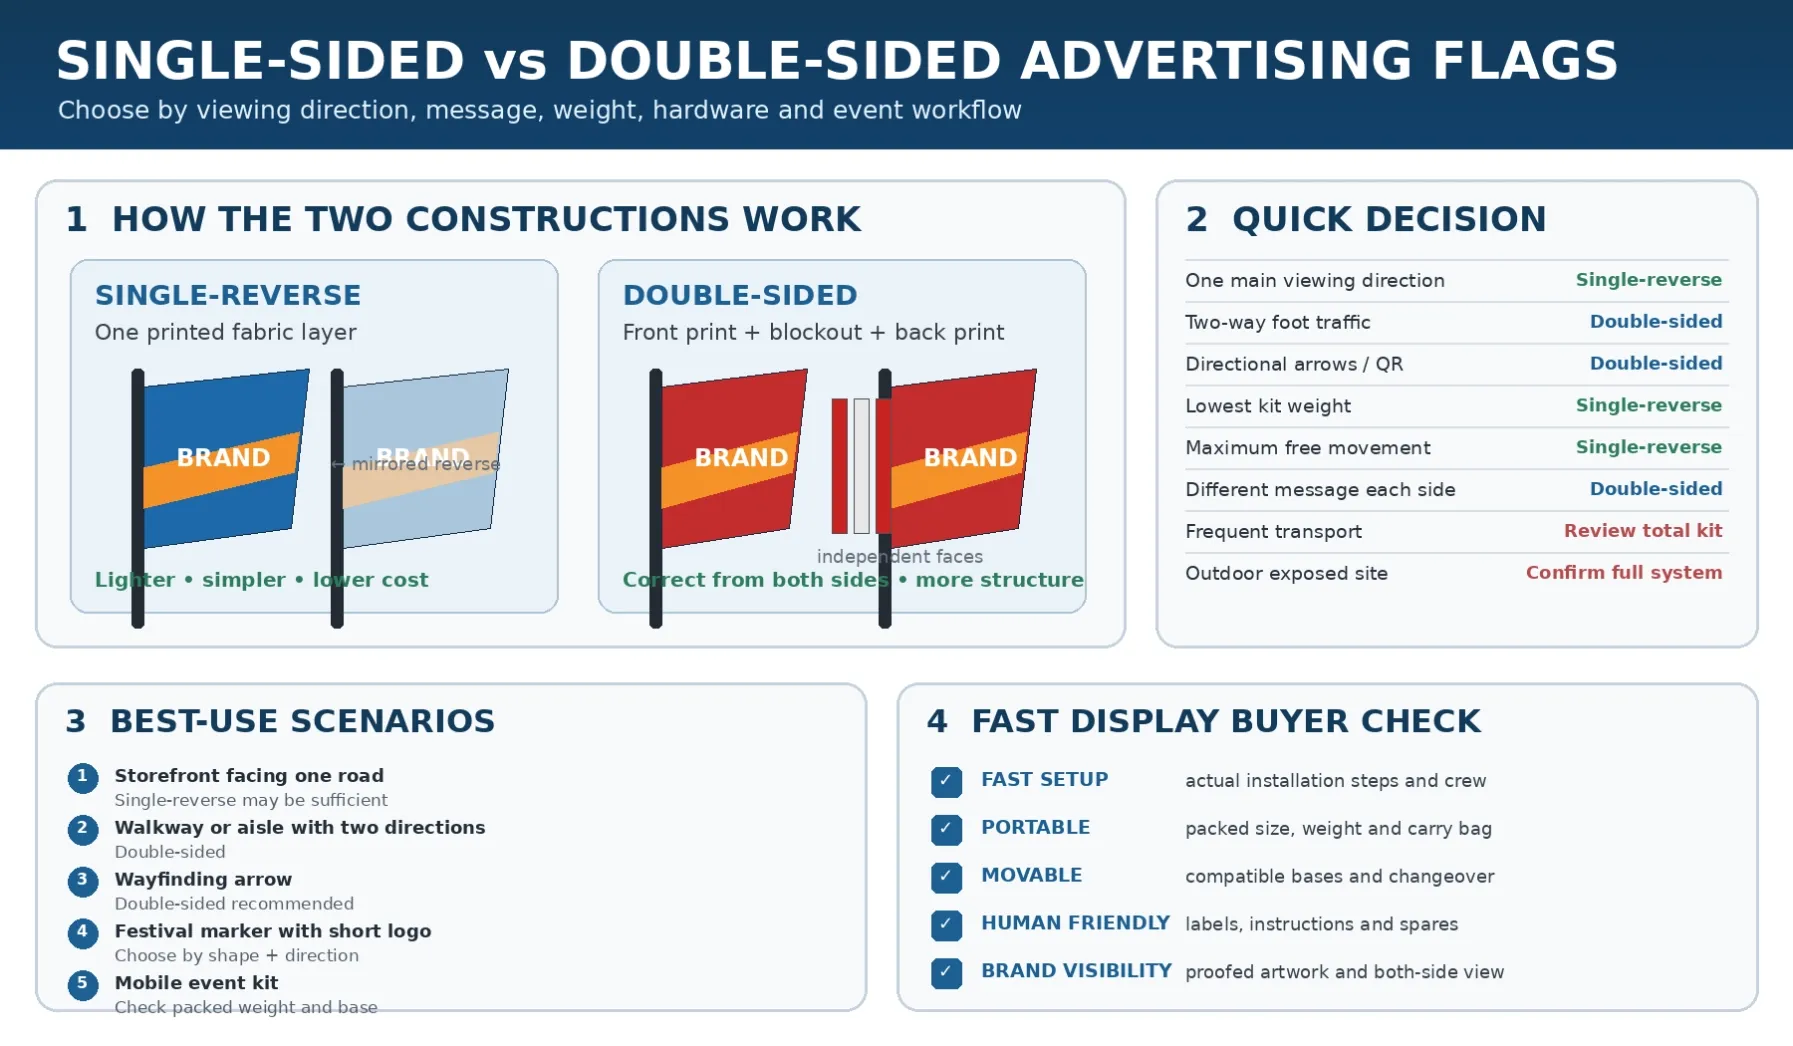
Choose single-reverse printing when one main viewing direction, lower graphic weight and simpler handling matter most. Choose double-sided construction when the message must read correctly from both directions, each side needs independent artwork, or arrows, phone numbers, URLs and QR codes must remain correctly oriented.
The correct decision also depends on the flag shape and size, message content, pole and base compatibility, packing, event surface and approved artwork. Compare the complete kit rather than the printed fabric alone.
1. Clarify single-reverse and double-sided terminology
A single-reverse flag uses one printed fabric layer. The primary face shows the artwork in the intended orientation, while the reverse normally appears lighter and mirrored. The reverse is visible, but text and directional graphics do not read the same way.
A double-sided flag uses two printed faces with an opaque or blockout layer between them. Each face can display correctly oriented artwork, and the two sides may use the same or different approved designs. The added layers also affect weight, sewing, movement and hardware selection.
2. Start with the viewing directions
The most important question is where viewers approach from. A flag against a wall or facing one storefront direction has different needs from a flag in an open aisle, two-way entrance or roadside location.
Double-sided construction deserves priority review when:
- Visitors approach through a two-way entrance, open aisle or registration lane.
- The flag stands beside a road, forecourt or other location viewed from both directions.
- Each side needs a different offer, language or message.
- Directional arrows must point correctly from both directions.
- Phone numbers, URLs or QR codes must remain correctly oriented.
- The brand requires the same approved presentation on both faces.
Single-reverse construction may be sufficient when:
- The display has one dominant viewing direction.
- The artwork is logo-led and reverse orientation does not create confusion.
- Lower graphic weight and freer fabric movement are priorities.
- The kit travels frequently and compact handling is important.
- The campaign is cost-sensitive or short-term and two-way readability is not required.
3. Match the print construction to the message
- Large logo or color block: single-reverse may work because recognition can remain strong even when the back is mirrored.
- Short slogan: decide from the viewing direction; mirrored text may be unacceptable.
- Directional arrow: double-sided is usually the safer starting point because an arrow reverses on the back of a single-reverse flag.
- Phone number, URL or QR code: prioritize correctly oriented artwork on every side from which the information must be used.
- Different language or offer on each face: use independent double-sided artwork and approve both faces.
- Detailed promotional copy: consider a backwall, banner or light box instead of forcing too much text onto a moving flag.
4. Compare graphic weight, movement and the complete hardware system
Double-sided graphics contain more material and sewing than single-reverse graphics. This can reduce free movement and change the load carried by the pole, spindle and base. The exact difference depends on the selected fabric, blockout construction, size, shape and sewing method.
Ask the supplier to confirm:
- Finished graphic size and weight for the selected construction.
- Total assembled height and compatible flag range.
- Pole material, section design and lower tension point.
- Spindle or bearing dimensions and rotation method.
- Base footprint, actual weight and approved ballast option.
- Longest packed component and complete kit weight.
- Carry-bag, carton and replacement-part details.
5. Confirm pole and base compatibility
Do not assume every double-sided graphic can use the same pole and base as a single-reverse version. Review the finished flag, sleeve, lower tension point, pole diameter, spindle, base, ballast and venue condition as one configuration.
- Grass or penetrable soil: confirm a compatible ground spike and venue permission.
- Concrete or pavement: compare a cross base with approved ballast, a fillable base or a weighted plate.
- Indoor floor: prioritize footprint, floor protection, trip risk and aisle clearance.
- Parked-vehicle promotion: use a compatible tyre base only under a stationary vehicle wheel.
- Exposed outdoor site: confirm the complete tested or approved system and an unsafe-weather removal plan.
6. Compare total project value, not graphic price alone
Double-sided construction normally requires two printed faces, an internal opaque layer and additional sewing and handling. The business question is whether correct two-way presentation creates enough value at the location.
- One-direction storefront: a second correctly oriented face may add limited value.
- Two-way event entrance: both approach directions see the message, so double-sided may justify the added construction.
- Car dealership or roadside position: review traffic direction, viewing distance and the compatible base before deciding.
- High-volume short campaign: single-reverse may reduce cost and handling unless message orientation requires otherwise.
- Premium sponsor or wayfinding zone: correct orientation and consistent presentation may justify double-sided construction.
- Touring program: compare kit weight, packing and replacement workflow across repeated events.
7. Use separate artwork and proofing checks
A single-reverse flag normally starts with one primary face; the buyer should still review how logos, text and arrows appear on the mirrored reverse. Double-sided artwork requires approval of both faces, even if the same design is repeated.
- Confirm the front-view orientation and pole-sleeve side.
- Confirm whether side B repeats side A or uses different artwork.
- Keep critical text and logos inside the approved safe area.
- Avoid placing important elements near seams, sleeves or curved edges.
- Confirm the color reference and proofing method.
- Check arrows, QR codes, phone numbers and URLs on both approved faces.
- Approve the finished graphic dimensions, not only the overall pole height.
8. Apply the decision to common event scenarios
- Storefront facing one street: start with single-reverse if most viewers approach from one direction.
- Event entrance: review double-sided when guests arrive from both directions or wayfinding must remain correct.
- Trade show aisle: review two-way traffic and whether the flag is against a backwall or open to both sides.
- Sports route: decide from approach angles, sponsor text and any directional information.
- Car dealership: review road and lot traffic, exact placement and compatible vehicle or hard-surface base.
- Indoor promotion: single-reverse may be enough in a controlled one-direction layout; an open floor plan can change the decision.
9. Verify BESDA value with measurable evidence
Operational terms should connect to facts that can be checked for the quoted system.
- Fast setup: assembly steps, component count and tool requirements.
- Portable: packed dimensions, kit weight, carry bag and carton plan.
- Movable: compatible base choices and a documented changeover method.
- Human friendly: labels, instructions, manageable parts and spare-part references.
- Brand visibility: approved front-and-back proofs, suitable scale and accurate application images.
10. Check double-sided flag quality as a complete system
- Front and back artwork orientation matches the approved proof.
- The opaque or blockout layer covers the intended area consistently.
- The two faces are aligned to the approved production requirement.
- Seams, sleeve and lower tension point are secure and visually consistent.
- Finished dimensions match the approved specification.
- The graphic fits the approved pole and tensions or rotates correctly.
- The base and ballast match the reviewed configuration.
- Flag, pole, base, bag and instructions are packed and labeled as the correct kit.
Do not rely on universal opacity, alignment, wind or durability claims unless they are supported by the selected material, configuration and test method.
11. Send a complete RFQ for a comparable quotation
- 1. Flag shape and finished graphic size.
- 2. Total assembled height.
- 3. Single-reverse or double-sided construction.
- 4. Artwork for side A and side B.
- 5. Quantity for each artwork version.
- 6. Pole material and section requirement.
- 7. Venue surface and base preference.
- 8. Indoor, sheltered outdoor or exposed outdoor application.
- 9. Carry bag, labels and spare parts.
- 10. Packing, destination and required event date.
- 11. Sample or pre-production approval requirement.
Frequently asked questions
Is a single-sided flag blank on the back?
No. A single-reverse flag normally shows a lighter mirrored version of the front artwork. The exact appearance depends on the approved fabric and print process.
Can a double-sided flag use a different design on each side?
Yes, when the selected construction uses independent printed faces. Approve both artworks for orientation, safe areas and alignment.
Why are double-sided flags heavier?
They use two printed faces plus an internal opaque layer and additional sewing. Confirm the finished weight for the selected size and construction.
Does a double-sided flag need a stronger pole or base?
It may. Added graphic weight and different movement can change the load on the complete system. Confirm the pole, spindle, base and ballast for the exact configuration.
Which option moves more freely in light wind?
A lighter single-reverse graphic generally moves more freely, but shape, fabric, size, pole tension and site conditions also matter.
Is double-sided always better outdoors?
No. It improves two-way readability but adds weight, cost and hardware considerations. Choose from viewing direction and the complete system.
Can a QR code be printed on a single-reverse flag?
It can be printed, but the mirrored reverse will not work as the same correctly oriented code. Review double-sided construction if scanning from both directions matters.
How should two quotations be compared?
Align the graphic size, fabric, construction, pole, base, bag, spare parts, proofing, packing, destination and deadline before comparing price.
What evidence should I request?
Ask for real front-and-back photos, construction details, finished weight, compatible hardware, setup information, QC points, packing and an approved artwork proof.
Choose the print construction around the message and location
Choose single-reverse when the campaign mainly faces one direction and lower weight, freer movement and simpler handling matter. Choose double-sided when correct two-way readability or independent artwork justifies the additional construction. Approve the flag, pole, base, artwork and packing as one system.
Use the BESDA contact form to send viewing directions, artwork, flag size, quantity, venue surface and transport requirements for a print-and-hardware recommendation.